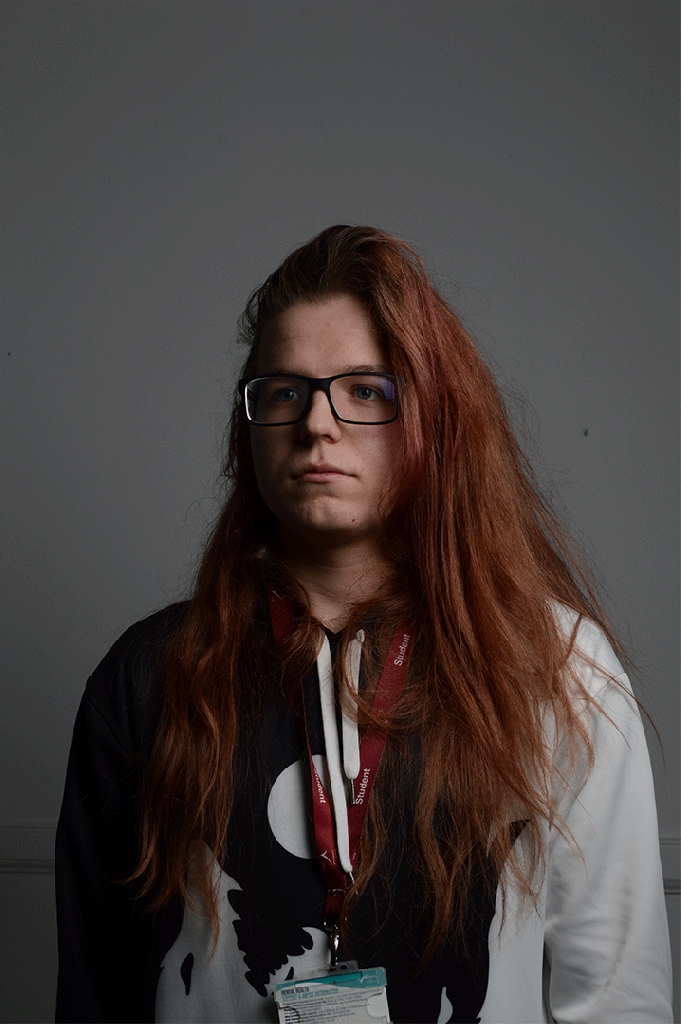
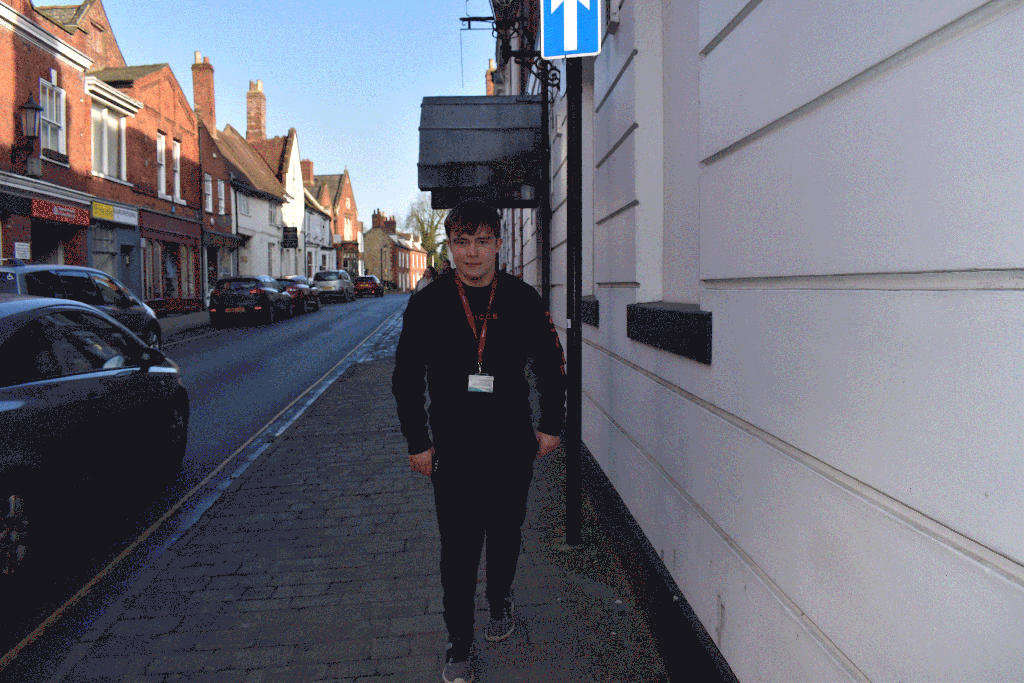
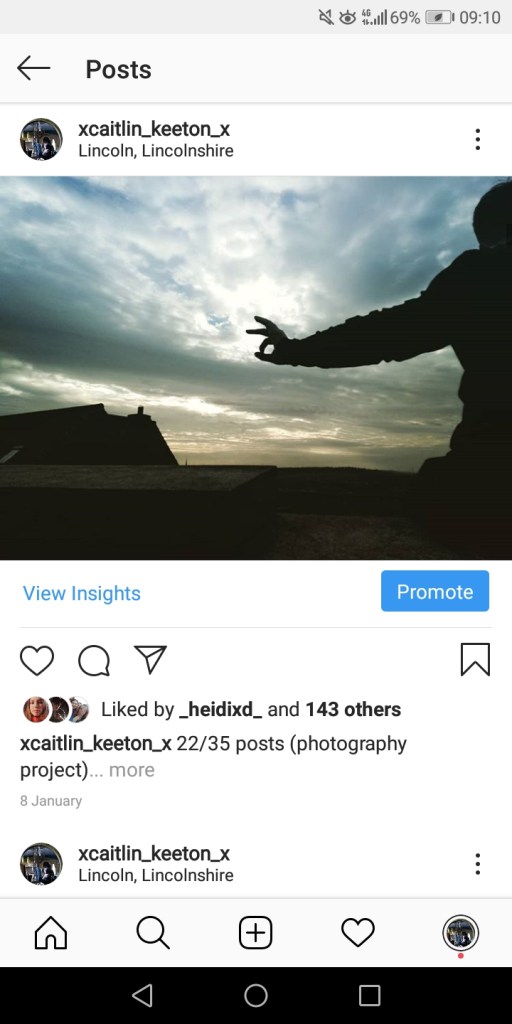
What I am drawn to by using this technique is how easy it was to make yet how much of an impact and effect it has afterwards. Here he was completely standing still but by using this technique it made it look as though he was moving in a surreal way that captures the eye and gives us curiosity on to how. I believe it gives an awesome effect and would be even better if the background be the sky and I was taking the pictures from ground level to make the person look more superior with movement.
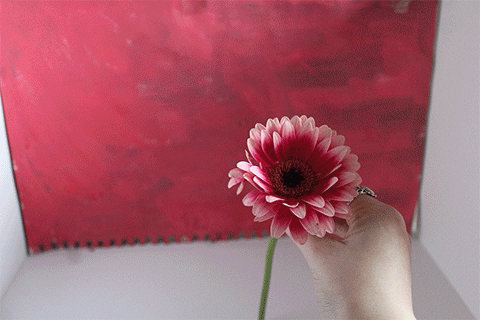
I am quite satisfied with how this turned out as my first GIF. There are some things that I could’ve improved upon such as: Using the space more effectively rather than just moving the flower around, I could of kept changing the background colour constantly and made sure the petals were scattered all over the bottom to cover all of the space. I feel as though setting the time frames to 0.5 secs rather than 1 sec (the usual time I select) as it made it flow more naturally and quicker as using 1 sec for the time frames made it a lot more slower and not looking so much like a proper GIF.
2nd GIF made at home:
I do much prefer the first GIF over this second one, as I feel as though this one turned out pretty messy and it isn’t very appealing or entertaining to the viewers’ eye. I believe I should invest in a tripod for my future GIFS, as my camera moved alongside with the candles. Even though I used glitter for this GIF, it doesn’t look very great to the eye. It was easy to make on photoshop and flows through each frame with ease due to me setting it at 0.5 seconds per frame.
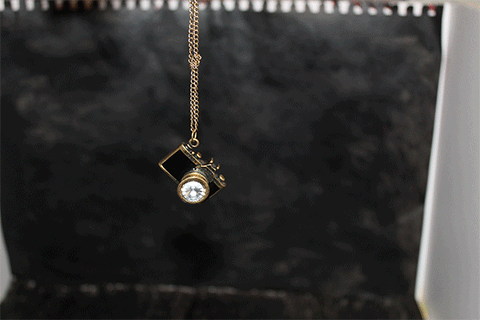
I believe I included personification when making this GIF, as I focused on trying to create shapes and movement with the necklace chain to give it more of a personality, being mischievous when taking the shot closeup (i used my flash) and going back. It didn’t quite work out when i was hoping for it to be apparent that it was taking a picture, as the flash actually made it stand out better and the black more of a deep black with no spaces left where i painted the card, so in terms to improve this GIF i could of just shot it all with flash instead of natural lighting and to make it look like it took a picture I could of researched into better alternatives to secure my idea of that.
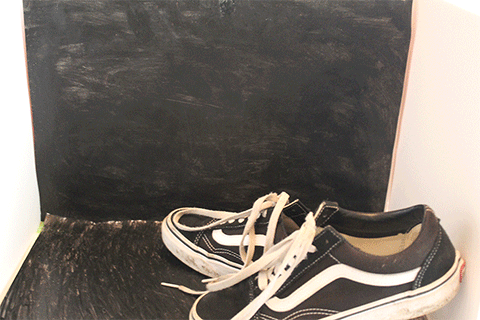
I believe I prefer this GIF compared to the one with the necklace because there is more of a creative idea to it when the rose is involved along with spelling out the words “love” with the shoelaces. Although I didn’t use a light blue shade of a background, I decided that keeping the black and white made my vans shoes stand out amongst it and the red rose stand even better and in better contrast with the bright red against black. It would’ve been better if i had a tripod so the cube space wasn’t moving too.
1.) Although the idea was quite basic and simple for Callum to be walking forward to the camera, I still find it quite effective and aesthetic because with every shot of different movement you can see the style of walk he displays moving from side to side, because of each of the frame times being around the same time about (1.0 seconds) it displays his movement more realistically and you can see his emotions and personality through every cut frame as it isn’t too fast or to slow. I feel as though I could of positioned it better, and to do this easily, I could’ve used a tripod.
2)
This GIF was shot by Callum. It’s very effective in the sense of seeing each small movement of my foot and leg till it finally shows the key design of the shoe with an added in hand gesture to show more edge and personality within the GIF. The time frames all add up to the same amount of seconds (being 1.0 seconds again, which is my preferred time for GIFS).
3.)
This one by far is one of my most preferred and likened GIFS out of the ones created as I feel like it’s super effective given the way you can see the movement of the hand gesture which then also hits the sun. I do feel as though I could of shortened the time frame seconds to about 0.5 for it to become more realistic, as I feel as though it’s too slow for it to be seen as a proper movement of the hand to create one gesture.
4.)
This one Callum took of Dan crushing the can. This GIF comes out as incredibly satisfying to the eye because you can see the amount of pressure applied in each frame, I also found this a lot more easier of a GIF to make than the others because there weren’t too many layers to add on top of each other so i didn’t get as confused and it saved a lot more time.
5.)
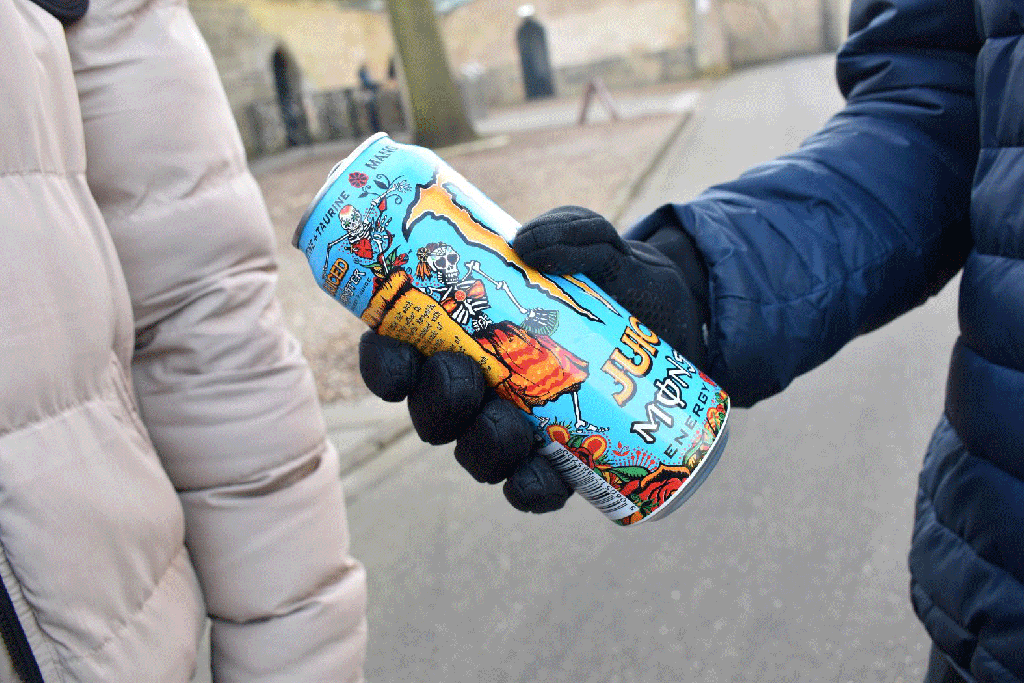
This one was took of Dan drinking from the can. What makes this GIF stand out from being different rather than too basic, is the fact that he wiped his mouth afterwards to make it all seem more realistic and add in emotions to make the GIF more unique. It would of been a lot more improved if I didn’t have the exposure on so low as it wouldn’t of made the GIF as dark.
Overall, doing the practice GIFS came out as very successful and showed me how much more simple it gets each time and how effective it gives off than just a simple video clip as you are able to notice more details when it’s just in separate time frames. This has given me a sense of more ideas for the GIFS yet to come to make.
In this project, I have learnt that using square format is extremely useful for when wanting to make everything proportional in the shot and it is great for when you want to focus on something in the distance as it draws you closer. I have also learnt how many different ways there are to express yourself as a photographer, simply by the way you layout your website and what colours you choose. I have learnt the many techniques that comes with using composition in our images, such as rule of thirds, shapes, diagonal lines etc. I have learnt the comparison between Instagram and WordPress and their features and I have learnt the advantages and disadvantages that comes out of using Instagram filters with my pictures.
The topics that I have found has been quite successful for me is such things as, learning how to get better shots by widening knowledge of the different formats that come with taking shots such as square format. I have also found that my shots for negative space have been successful in the way they turned out, and the effect that it gives and the detail it brings out of the main subject compared to the negative space in the background or around it. I have also widened my knowledge upon the many different Lomography cameras and experimentation techniques which gives a very pop retro style yet with super affordable Lomography cameras due to it being poorly technical.
I feel as though there were definitely some areas I could have improved upon such as; trying to figure out my way around on the website myself, as I’m still unsure about how to change specific things on the website and how to use some features. I also could have improved on including more information on the Hasselblad camera and what its main features are and including more information upon the different genres in photography. Another thing I could’ve improved upon is having a better shoot for my composition images, as I feel majority of my pictures for it was lacking in a lot of the composition techniques.
I have used a range of features for this project, including looking at Instagram filters and hashtags, which have shown me how to improve your photos (the filters, which can sharpen them and add more or less saturation) and how to reach them out to a wider audience (the hashtags, which target what people are looking for). I have used different fonts upon WordPress and what theme layouts are available to use for creating our website.
The research I have done for this project, is taking a look at other photographer’s websites and how they have made it their own and to express the person they are behind the camera which really inspired me to wanting to eventually create my own professional website, and use different fonts, and use different photo layouts to best showcase my work and the genres I do. Also, doing research upon Lomography cameras such as the Diana camera, really has made me want to get my own to experiment taking shots such as city landscapes with them because I love how some of them can cause sprockets and retro filters which make it seem like you are watching and going through ‘1980’s tapes’.
For me the overall project has been somewhat successful, but definitely more successful I’d say than the last two projects in terms of understanding (except from getting used to the WordPress features). I have learnt a lot, which has encouraged me to wanting to do some of these techniques and creating my own website in the future to come.
The most enjoyable part of the project for me has been learning about the Lomography cameras and experimenting with negative space as it really allowed me to look at things differently and perceive things different in photography.
What I might avoid doing in future projects is spending too much time on certain topics and to stop including unnecessary information.
My time management for this project wasn’t that great at the start but once I got a few topics covered at home , I was then able to catch up and follow on through the rest which has been pretty good near the end which is a big improvement compared to the last two projects.
Compositional techniques and restrictions when shooting in a square:
Starting first with the basic properties of a square:
. A very stable shape, symmetrical and clear.
. Takes away dilemma of choosing between portrait and landscape.
. While placing subject in middle, with composition it only works well in square format
. Allows creativity
Things to look at when using composition:
. A frame within a frame
. Circles
. Side shot
. Rule of thirds
. Diagonals
. Rule of three
. Full landscape shots are often the hardest to achieve when restricted to a square
Examples of some of these techniques being used:
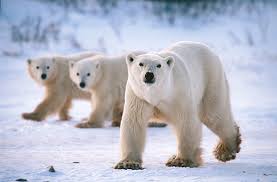
Rule of three (three bears) which makes the image satisfying to the eye as there are 3 different subjects to focus on with a white snowy background filling in the space (which makes it easy on the eye) to give more focus upon the bears. Many shapes are being presented in this image, but evenly and also includes frame within a frame, this can instantly strike the viewers attention and draw us to each and every shape which seems to be where the main subjects are placed and centered in. This technique seems to be very useful when the photographer is wanting to express and lead us to different subjects and their movements.A variety of circles are portrayed within this photo, because they are also evenly spaced out between each other, our eyes draw to each circle in a certain pattern either looking from up or down, or side to side. It also frames the sea behind the image to give a more gentle and calming appeal to the shot.
Some of my own pictures using these composition techniques:
1.)
This photo has suitable composition due to the two deer statues being evenly spaced out and creating a shape in between. There is the subject of the flowers first, then the subject of the deers and then the subject of the tree plants behind which can be considered rule of thirds. It’s satisfying to the eye due to the way things have been positioned, and the way the different colours contrast well together.
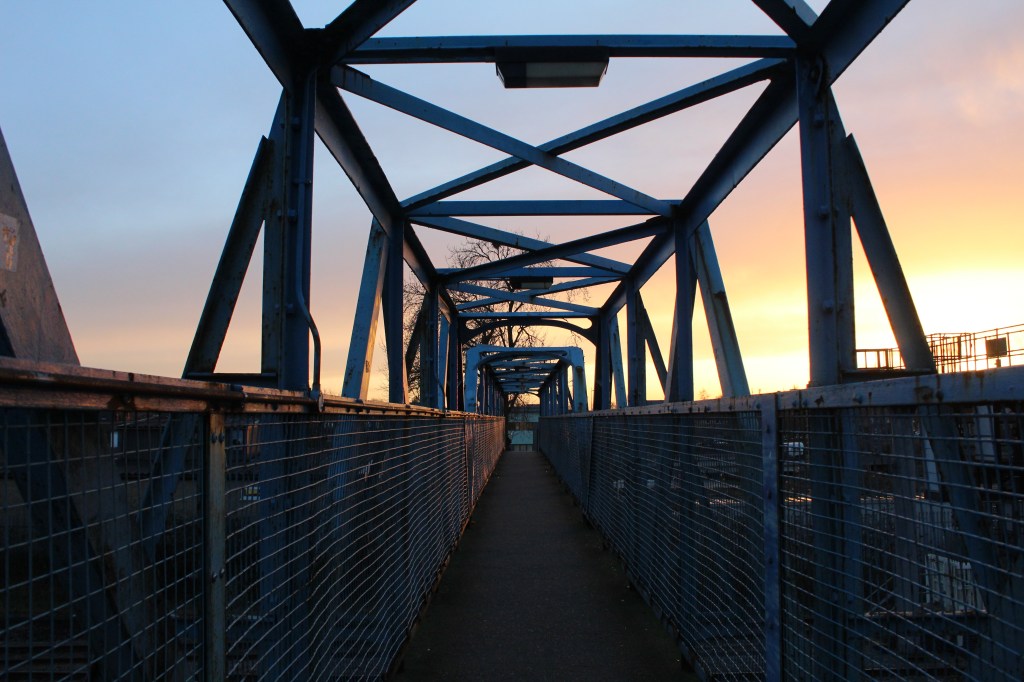
2.)
The bridge structure has many different framing points along the top which strike out as different shapes imprinted of the sunset behind. It also includes a leading line which is straight in the middle which also can be seen as rule of thirds. There is diagonal lines placed with the structure of the bridge.
3.)
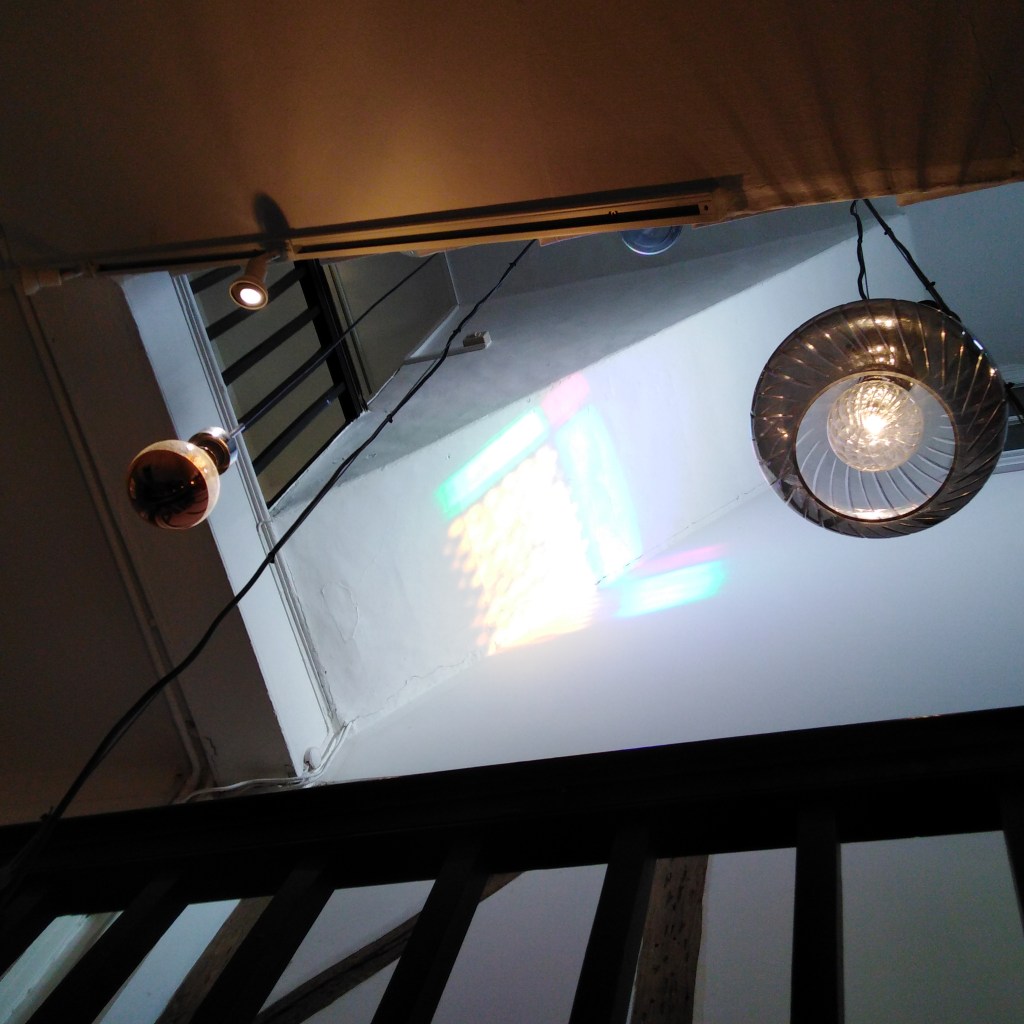
This shot includes circles of the lamp and is framed by the banister beneath and the ceiling on top, lines and reflections are presented by the lamps on the ceiling which creates a surrealistic effect and and our eyes are drawn to the two lamps and then the reflection. The composition within this shot is somewhat good but could of been better improved by using rule of thirds properly and searching for diagonal lines and more shapes.
4)
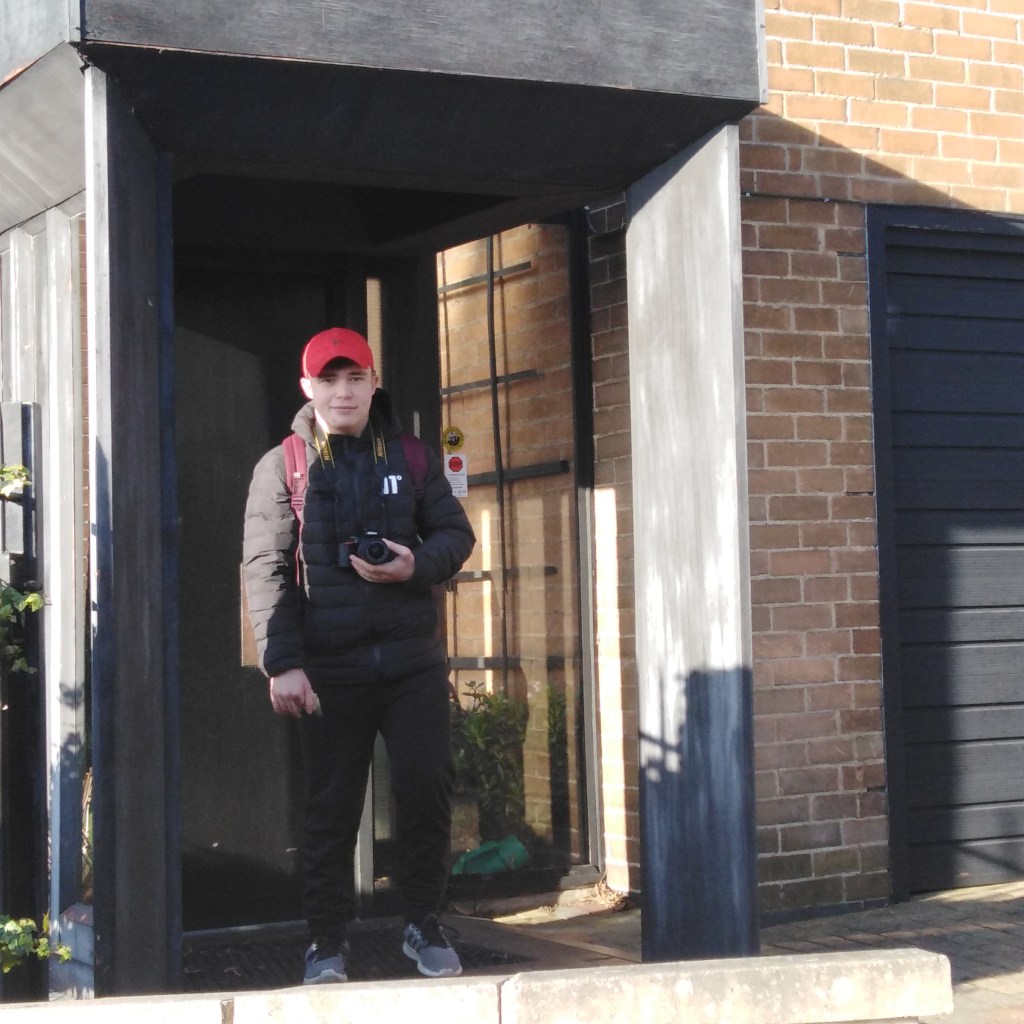
I believe this can be seen as a frame within a frame. Although this shot isn’t the best in terms of lighting and not many subjects within, it is a suitable example of the “frame within a frame” technique, as Callum is placed in the middle of the doorway which does have another small doorway behind.
5)
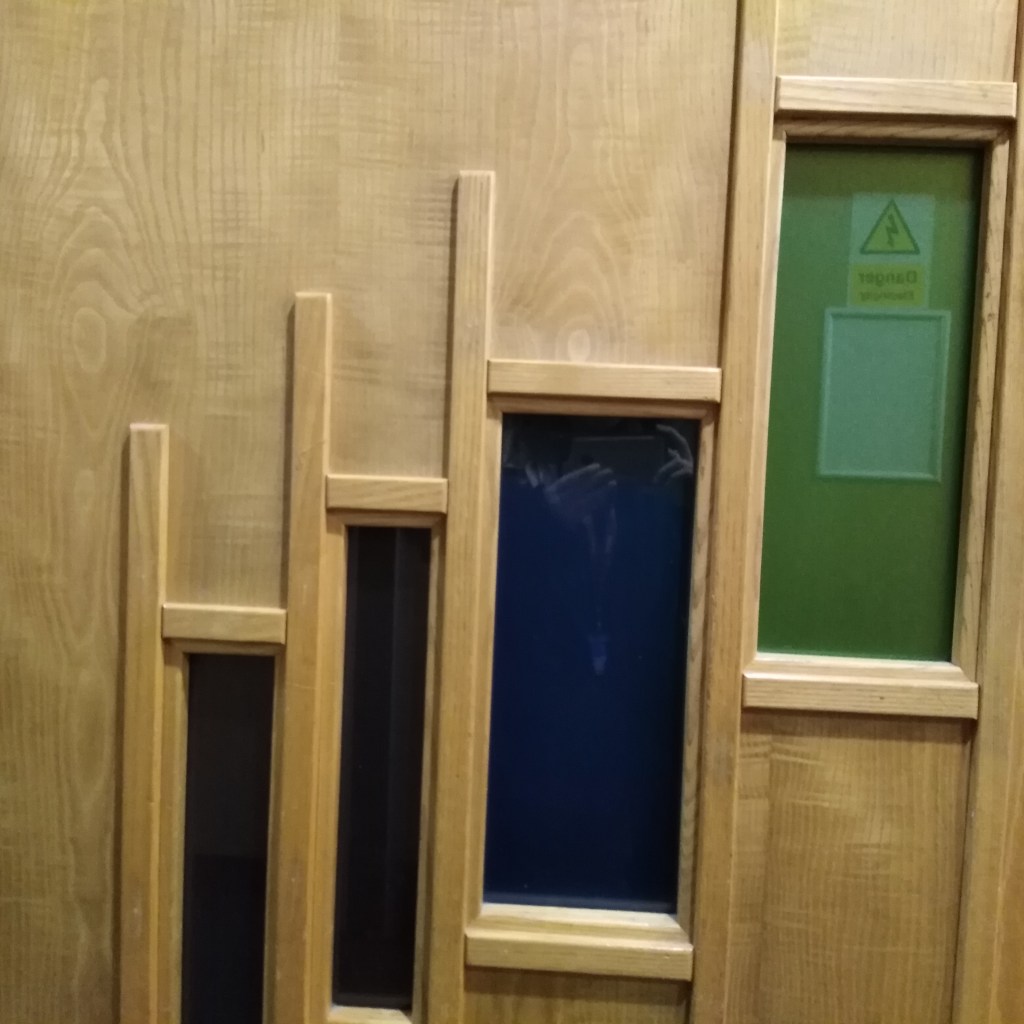
The shapes formed upon the door, are placed in a way that the next rectangle gets lower and lower. It’s a good example to show how each shape when being put lower beneath one another, can lead our eyes to each and every single shape within the image. However, definitely could’ve been improved by using ‘rule of thirds’ better and making the image more straight so that you can see the whole of the last rectangle and leaving space underneath the shapes.
6)
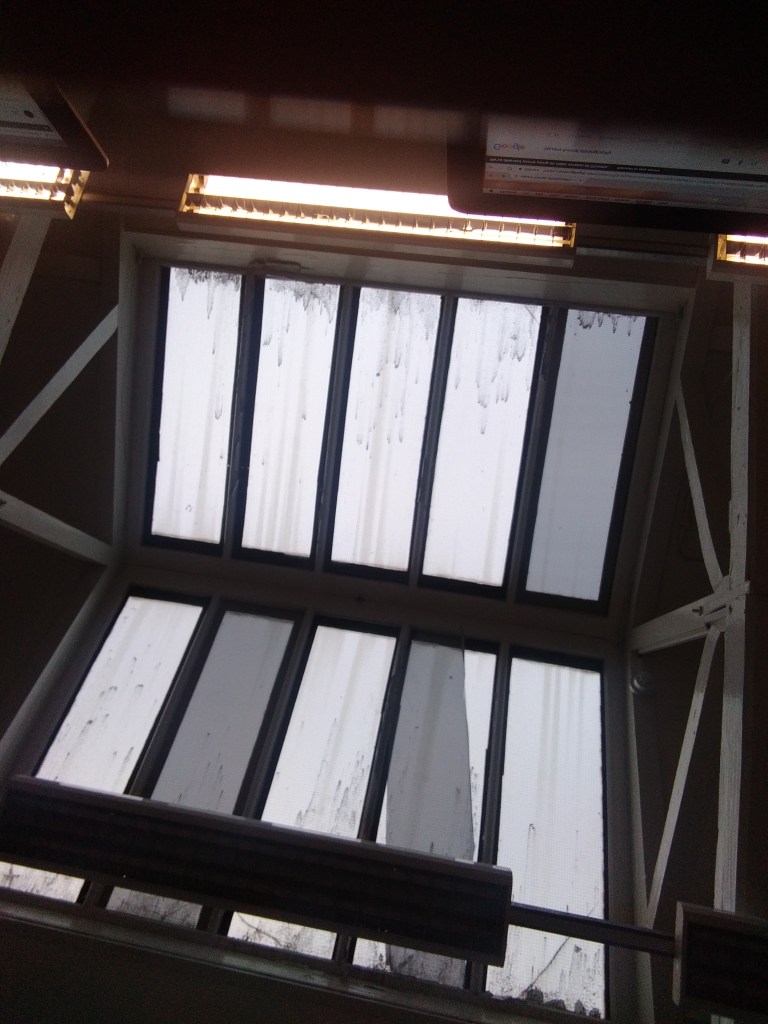
I am drawn to how this one is framed, because due to the two ceiling windows together it looks like it’s two mirrors placed together and reflecting upon one another alongside the diagonal lines on the side of them and the lines along the top which lights them the first ceiling window closet more. The shot seems quite abstract and dark.
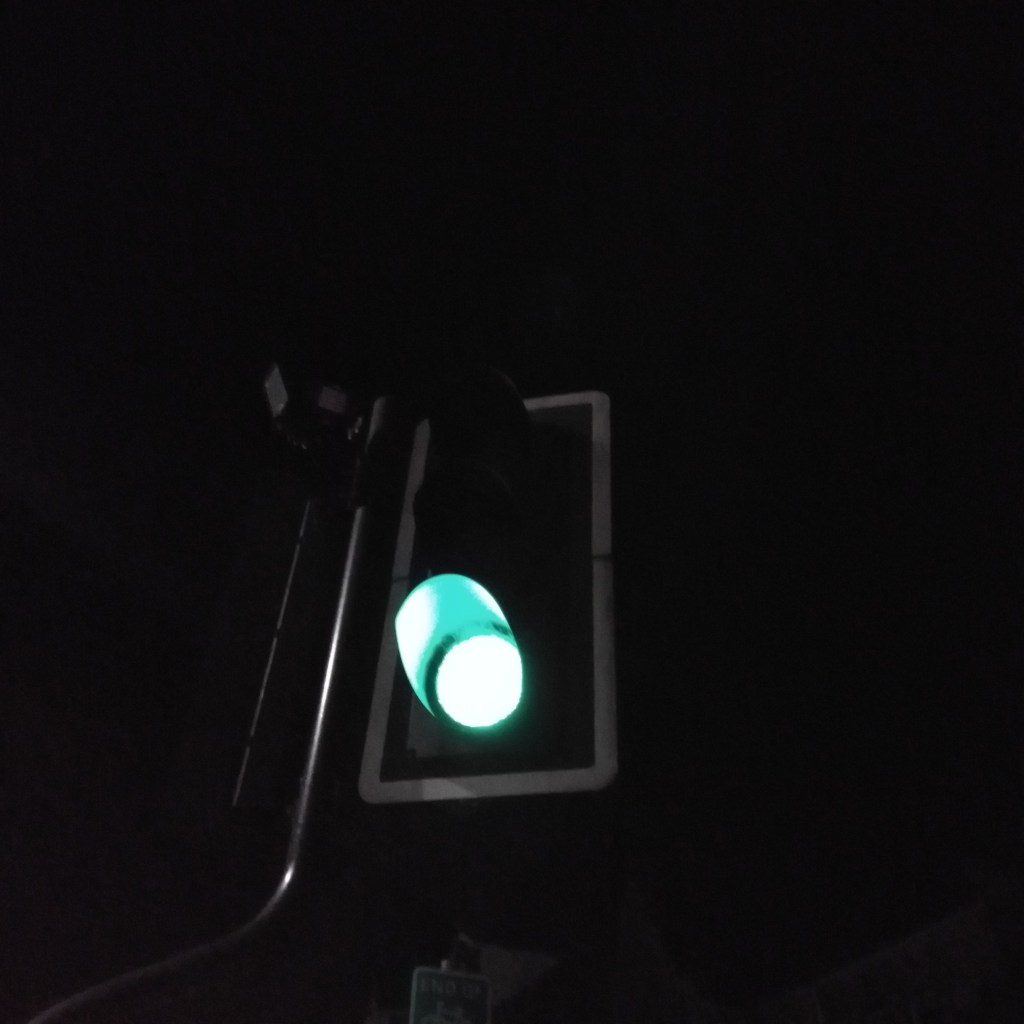
7)
Although this is a plain example of using composition within the image, it does still contain the circle which is lit up green and stands bright and strong compared to the darkened figure against the pitch black night sky. It draws in all attention and focus to the circle.
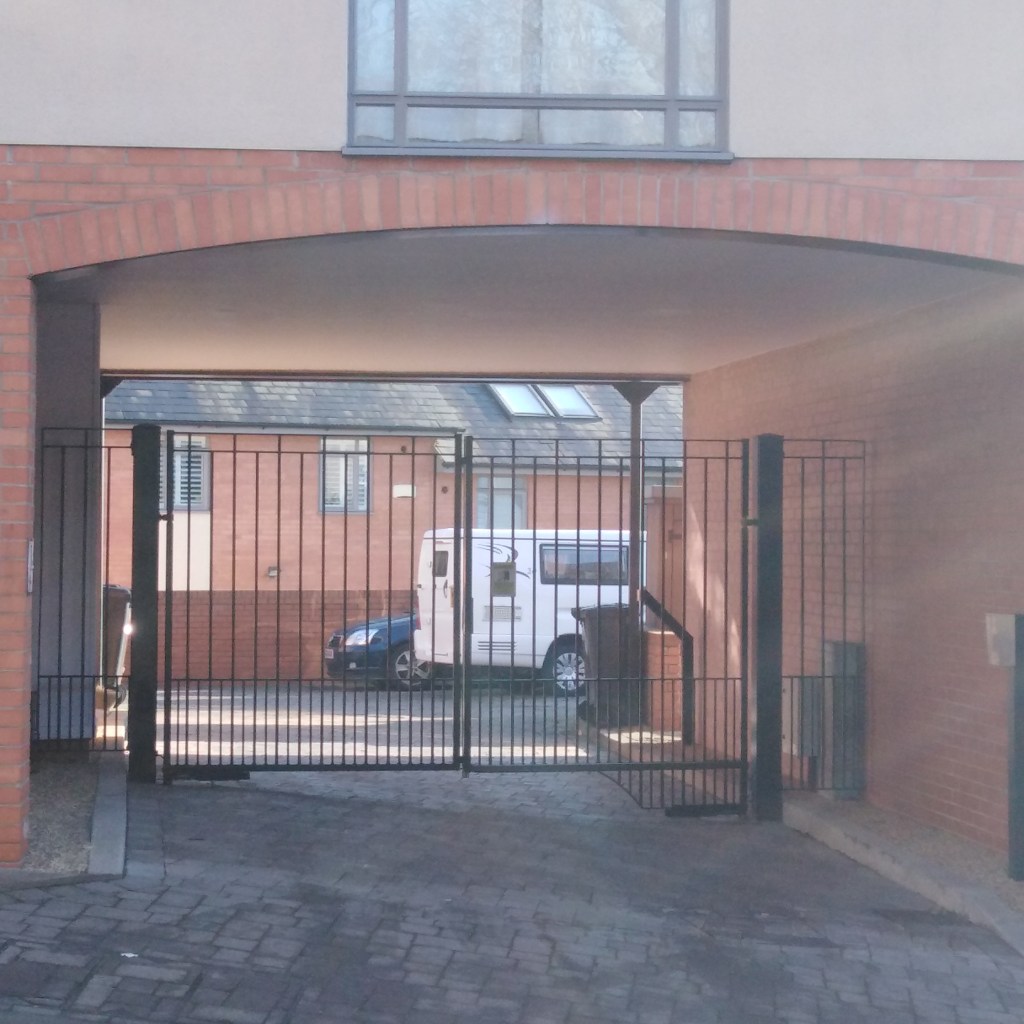
8)
Here the technique frame within a frame has been used, as the gate is framed by the wall and then the gate is framing the vehicles that is parked up behind the gate. It leads you onto each subject to notice. I wouldn’t say this is a very successful image of composition as I could’ve got more of the main wall in to frame the gate properly.
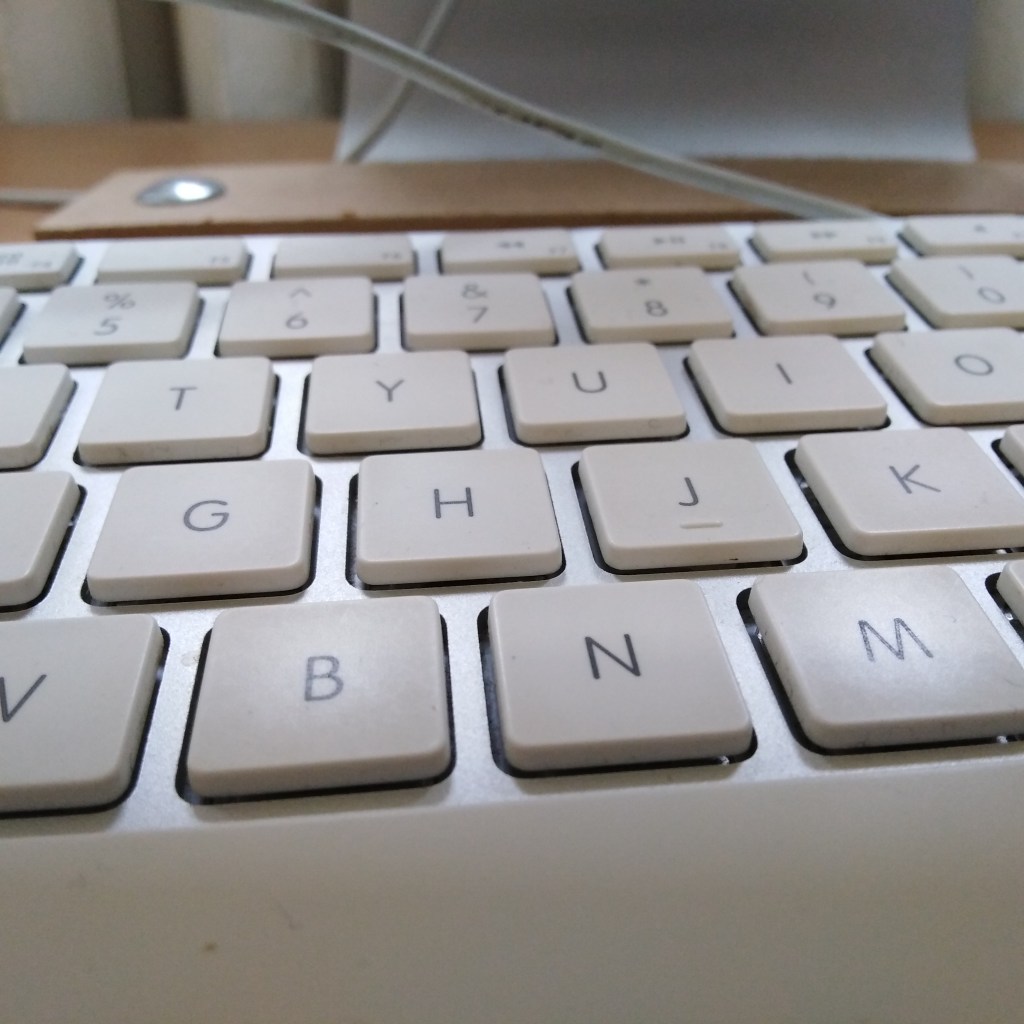
9)
I decided to take a shot of the keyboard in class, because it shows the constant repetition of squares next to each other. However; would of been better to take the shot going down from the side and including the whole keyboard in the shot leaving no negative space, so that the picture is full of nothing except the repetition of the same sized squares, which will give an effect on the viewer to be drawn to all the squares before them.
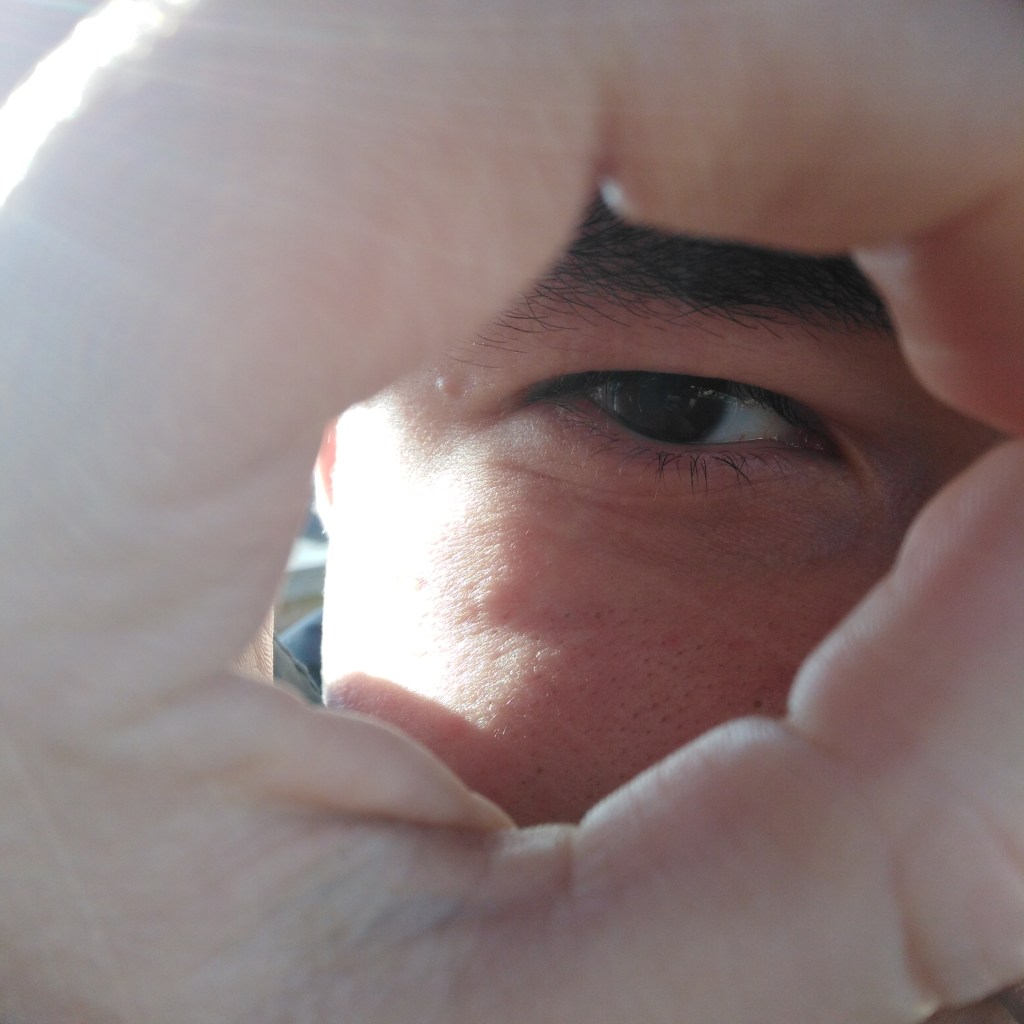
10)
So this is the last shot, I am including for experimenting with composition techniques. I created a circle shape with my hand, so that it’s a circle within a circle (Callum’s eye being the second circle) because of using this technique, it’s able to lead the viewer straight into the eye and nothing else, which allows them to focus on what I would first like them to notice as the photographer, so I am quite pleased with how this shot turned out due to those reasons.
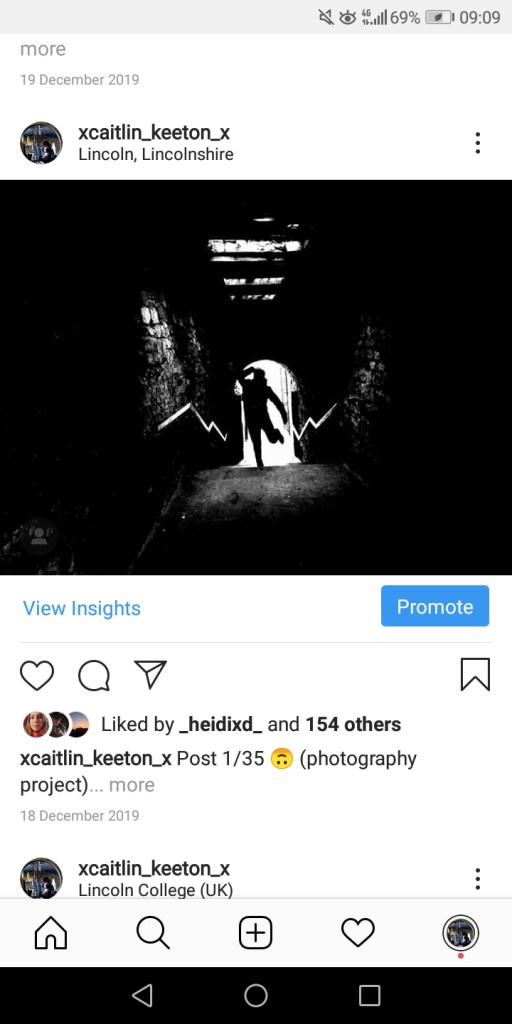
Here is post 1 of my photography project, a simple shot yet wanted it to be thought out so it was compositioned in a way that would satisfy the eye. By using square format, i was able to center Callum in the middle of the doorway where the light is behind him is. He is silhouetted along with the darkness around the tunnel to give an eery sinister atmosphere, which leads to him making an abnormal shape with his body to come across as different and unique and to express the battles with the darkness.
2)
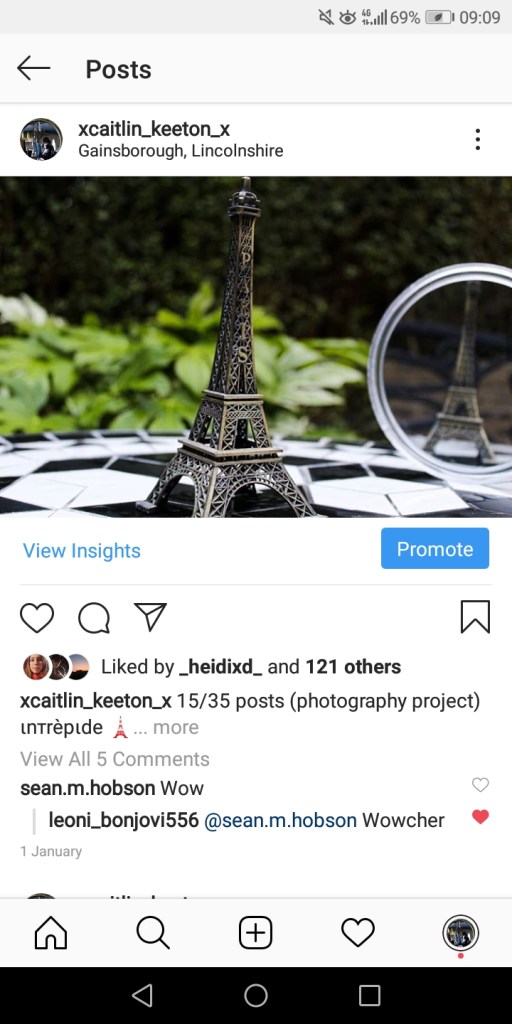
This is post 15, of my project. I’d say this shot fits into the genre of product photography, almost promoting the eiffel tower ornament. I chose to place it on a checkered table because the two textures and colours of the table and ornament contrasted well together, alongside having the greenery behind and a reflection of the ornament upon the mirror to have a back view of it. This is by far one of the posts i feel has been more successful out of the other shots because the image is more sharp and better thought out
3)
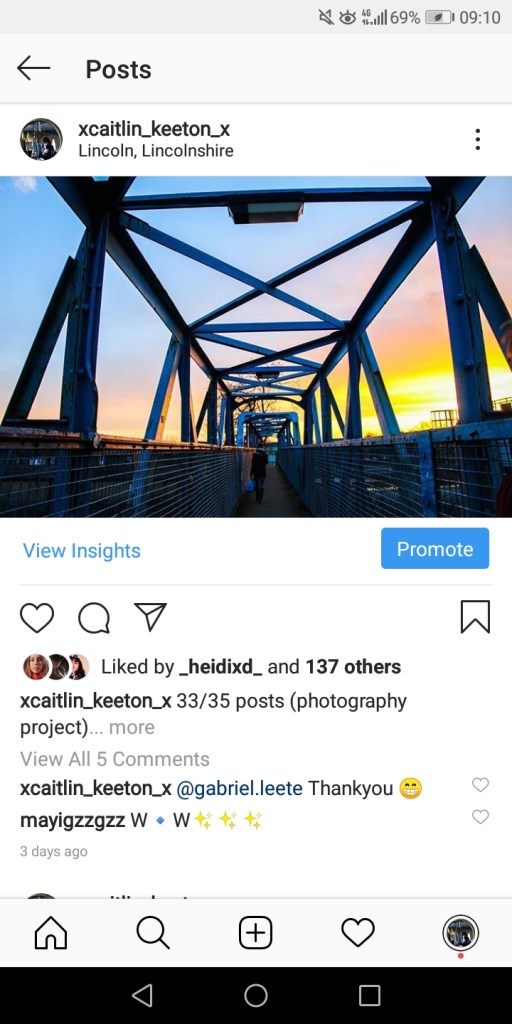
Here is post 33 for my project. A leading line shot upon the i suppose a somewhat bridge, the blue structure of the bridge strikes out amongst the pinky golden sunset behind. You can begin to make out a person walking, getting along with their daily life, which brings a sense of reality and calmness into the shot. However i do feel as though, this shot could of been improved by having a better composition. The rule of thirds, i didn’t use well within this shot which is why everything doesn’t seem equally proportional or straight.
4)
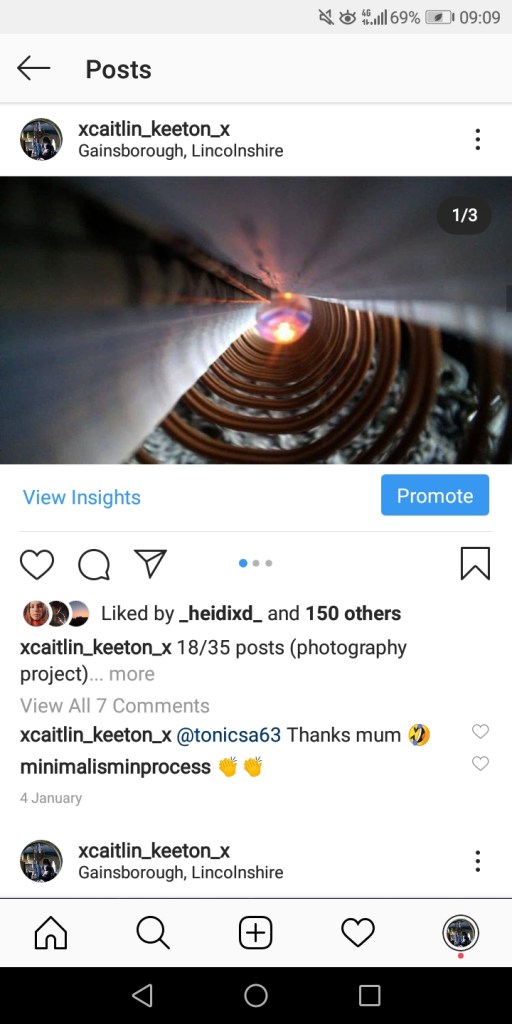
This is post 18 for my project. Using the metal binder of my notebook and a candle that is lit underneath. Using my phone camera i found was better to be able to take a shot through the binder that leads to a warm blur of yellow flames and the deep purple of the candle. It seems historic and actually quite “disney” like due to the magical sense of colours against plain pages of the book.
5)
Here is post 22 for the project. I actually experimented with this shot and wanted to see the outcome by using an Instagram filter, which completely changed the colour of the sky from a murky grey to a mixture of blue and gold which made the silhouette of callum be layed out upon an aesthetic background.
6)
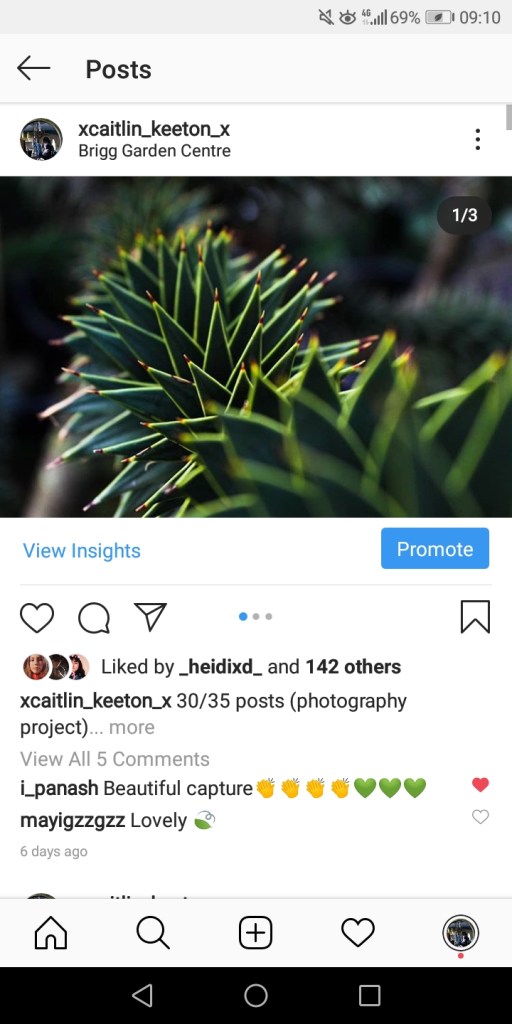
Here is post 30 for my project. A close up shot of the vibrant green spiked out leaves (could be seen as fitting into the genre of macro photography) Although I took this shot in a garden centre, to me it looks as though I took this in a Jungle due to it being a closeup, and the vibrancy and strong texture of it all.
7)
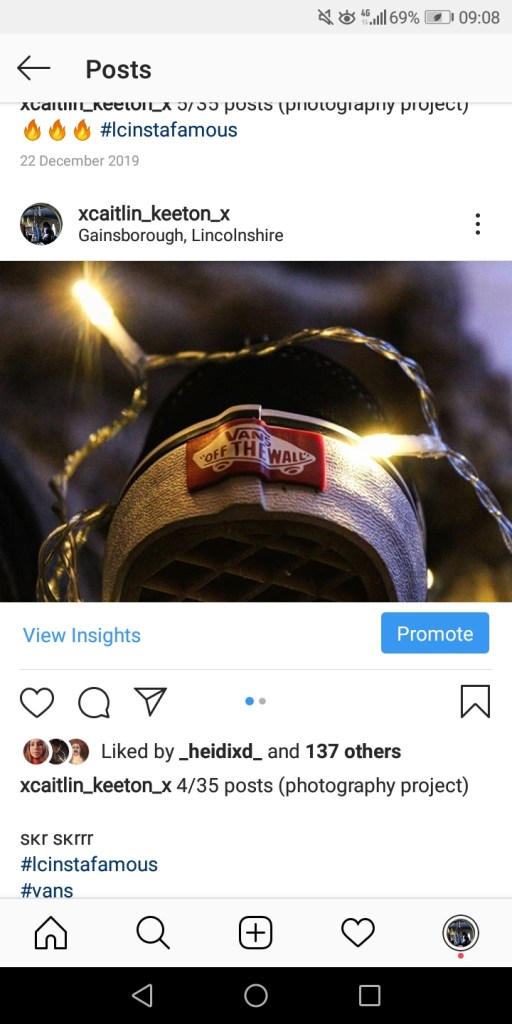
This is post 4 for my project. Again can fit into the genre of product photography as it’s though I am promoting the vans shoes. I decided to take the shot of the shoes by focusing on the section that stands out most which is their logo on the back of the shoe which i positioned upright to get a glance of it on camera, I didn’t want it to be too plain of a shot so i added in fairy lights to drape around it, to also light up the logo and to make the shot more aesthetically pleasing to the eye, as the red of the logo and warm lights stand out from the black of the shoe and against the dark background
8)
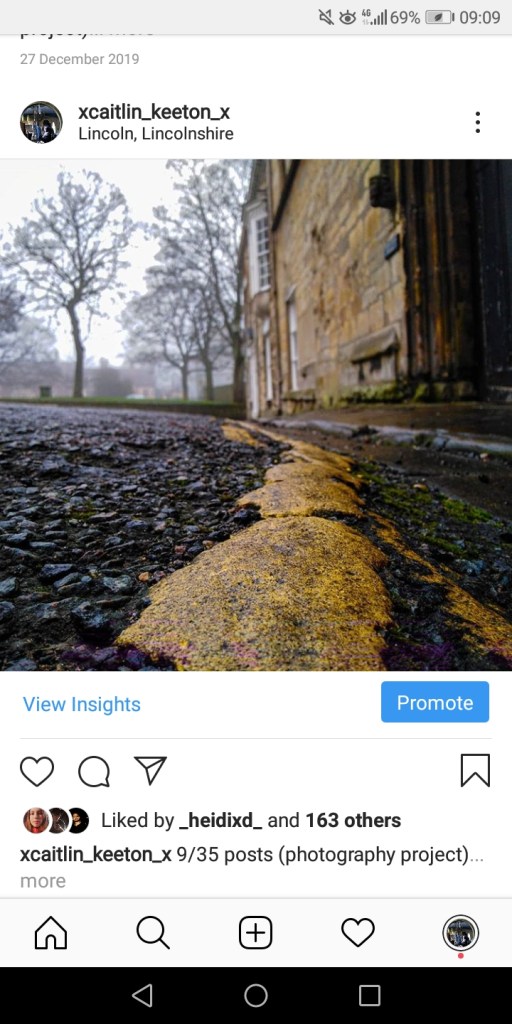
This is post 9 for my project. A leading line shot took in Lincoln. The vibrant yellow of the line stands out most against the whole image, which makes it a suitable leading line shot and following the yellow line with our eyes can lead us to the towering trees and building along the side.
9)
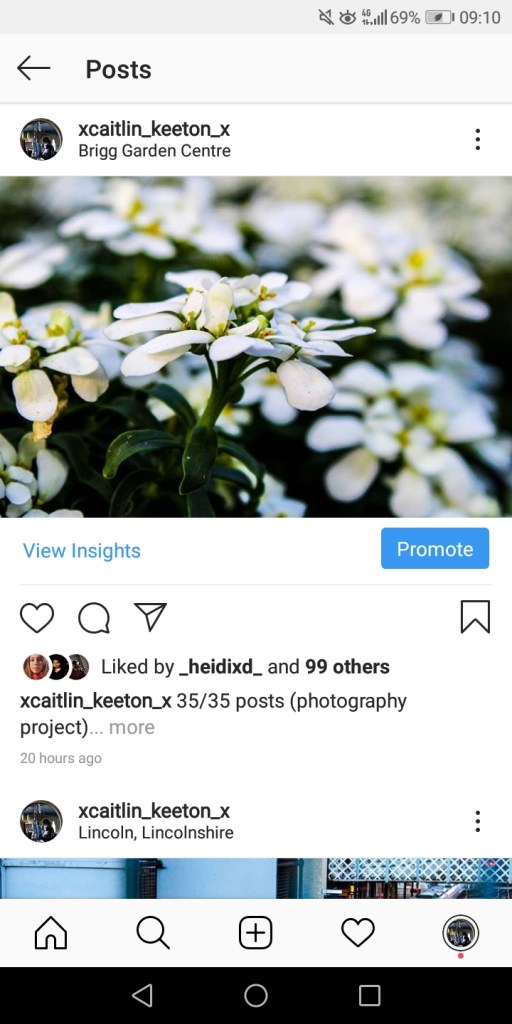
This is post 35 for the project. A close up shot of flowers (which i find that flower photography has always been a favourite genre to me). I wanted to choose a certain flower that stood out to the rest and this one i feel as though was the main one, due to it reaching out amongst the others and the way it’s petals are gracefully sticking out in different places, on top of one another.
10)
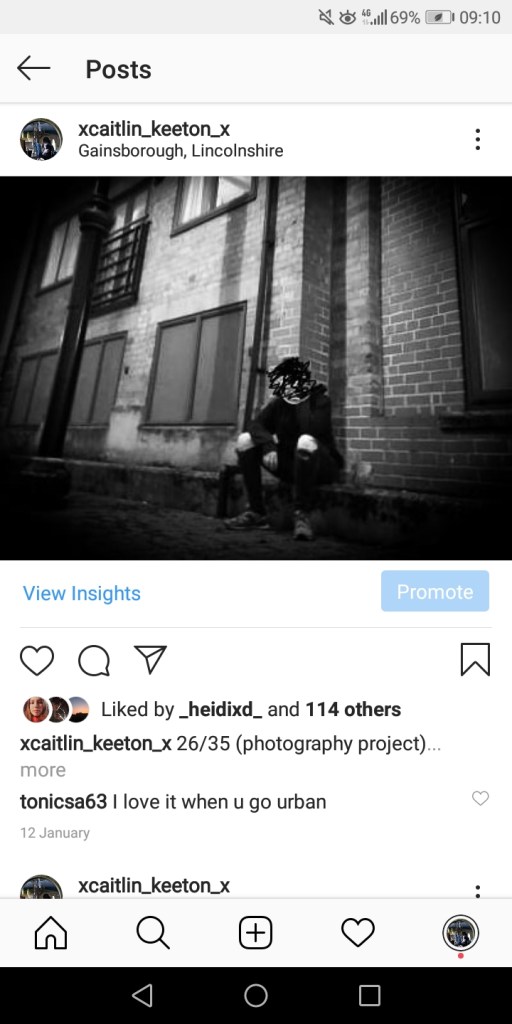
This is post 26 for the project. This is more of an urban landscape/portrait shot. I did edit this image to scribble out Seans face to potray the confusion and unknown of the person he really is and the mixture and battle of emotions against one another, i wanted to portray it all as negative which is why i also went for a monochrome filter and also edited it dark around the sides to make it look as though the darkness was closing up on him and eating away at all of that was left. I tried to go ground level but not too low, as i wanted to make sure there was negative space left upon the top of his head.
Instagram and WordPress are quite similar when it comes to promoting a specific business or showcasing certain things.
However despite some similarities occurring there are also some differences too, that make both the two platforms comparable.
Starting upon WordPress, when using it and typing you have the ability to change the text font to whichever appeals to you most, including on your blog posts and website. However; when looking to see if Instagram has this same option available, to see if you change your text font you are unable to as they don’t have any features to, if you feel like you want to change your font you have to rely on your keyboard or changing your font upon the internet and then coming back to Instagram to type in your chosen one. So while WordPress has this feature Instagram does not.
When wanting to place a filter upon your images on Instagram or WordPress both have the option to apply a filter that they have designed, however Instagram seems to have a lot more options available for the filters whereas WordPress have a smaller amount compared.
WordPress have different themes you can activate to make your page look a certain way and adjust so that the colours suit to it, however comparing this to Instagram there is only one theme that everyone can see which is the white theme unless they change it to seeing black. However you can’t choose a customized theme for your page for every person to see and there are no options available to do so.
WordPress don’t include hashtags like Instagram, which means it may be a bit more difficult for people to find our websites and blog posts whereas upon Instagram when uploading our posts we have the choice to include hashtags so we can target a certain audience to find our posts and therefore then take more notice of our account and posts.
I personally prefer using the platform Instagram because I find it an easier way to navigate through and there are plenty of filters and editing tools if i wanted to touch up my own photos and also i feel as though people are able to find my work easier due to the feature of hashtags. Despite not having different fonts available like WordPress, there are other ways I can apply that on Instagram. I feel as though it creates a suitable layout naturally for me to post as many photos I would like.
“Lomography is the style of pop photography based on the quirky cameras by the Austrian camera manufacturer known as Lomo…these cameras, and (all of them in the Lomo line) are usually poor technical cameras.”
Lomography is seen as a great art movement and encourages photographers to break free and get candid, coming with its very own rules, equipment and techniques; it requires minimal attention to the small technical details. When looking at what it’s all about, I see that Lomography is more or so a way that allows to express their personality and who they are more as well as being able to be more open – minded and creative with their photography in general.
Lomography cameras also seem to range only from around £40-£70, so not a great expense at all yet gives that pop gel coloured aesthetic to people’s photos.
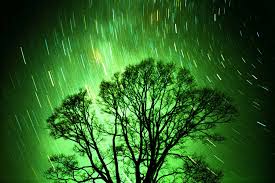
Gives this shot a very retro pop green colour which makes the image seem cryptic and dream like, it draws the viewer in by the wave and raindrop effect.Here i’m able to see that they have been able to use shutter speed successfully with their lomography camera, and also due to the pop filter the camera can create it makes the atmosphere of the city shot they took feel so much more modern and retro, including a sense of fast motion within the image which gives the shot more energy and mood due to the shutter speed used with the camera.
Diana camera –
“The Diana camera is a plastic – bodied toy camera using 120 roll film and 35 mm film. The camera has a simple plastic meniscus lens.”
It produces hazy, dream-like, radiant, lo-fi images on 120mm film and costs around £70 which is an affordable price to create aesthetic pictures and not such an expense.
The Diana Camera
There are some cool experimental techniques you can do with the Diana camera such as:
.”dreamy doubles” which is double exposure, being able to have the option to frame as much or as little as you like after each shot.
An example of dreamy doubles, it makes it super effective how they are both different colours which combine and contrast with each perfectly to make a good double exposure shot. Also to me it seems like it’s a scene from a film where they are at a party, because everything seems drunk like and hazy with the blur of their face against each other.
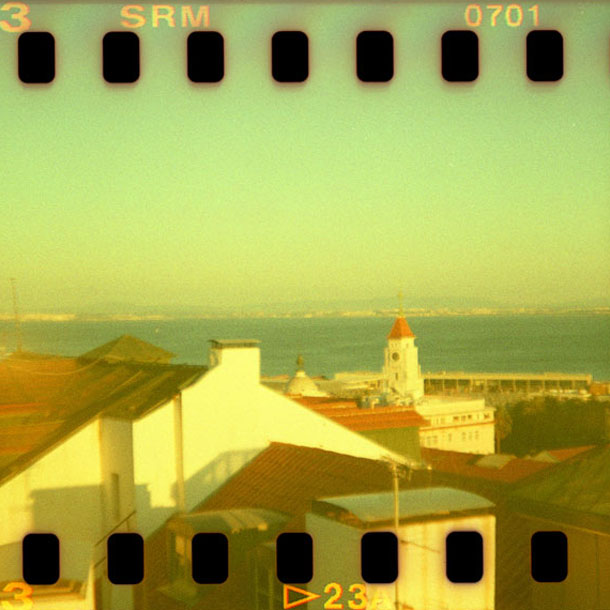
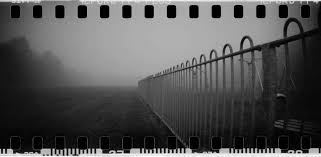
.”sprocket – full of romance” – Being able to do incredible lo-fi shots with sprocket roles and exposing the films sprocket holes.
Due to the sprocket roles, it gives a 18th century feel to it and being a retro pop yellow shade gives the impression that its summer whether if it really is or not when it was took. I’m really drawn to the casted shadows, with lomography cameras they seem to soften shadows instead of sharpen, this makes the shot more calming and delicate.
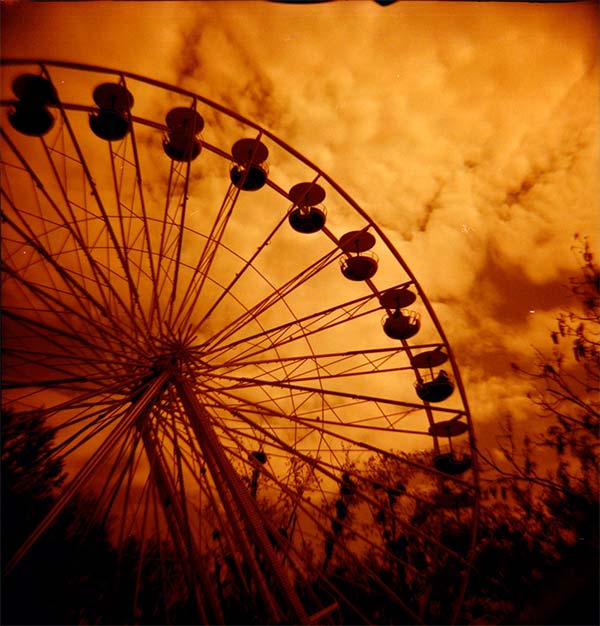
. “red-hot red scales” – You can achieve fiery redscale photos by loading the camera with lomography redscale film and makes your images glow with a warm honey tone.
Due to the red scale film, it makes the shot of the wheel seem like its on fire and that the clouds are red smoke coming off of it. It creates an atmosphere of danger and makes the dark subjects of the image stand out as black with the rest being in a moody red.
There are many different film rolls you can load the camera with to create different effects and tones within your shots, which evolves your photography with lomography completely.
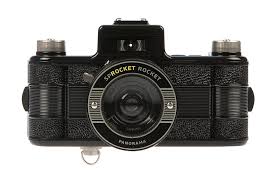
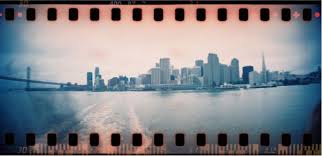
Another camera that I found for Lomography, is the “Lomography Sprocket Rocket Panoramic Film Camera” costing £50. Its a 35mm compact camera including a super wide angle lens for panoramas. it’s the first “analogue camera to be fitted with a reverse gear, allowing you to rewind and remix your photo.”
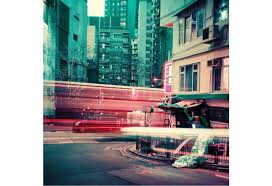
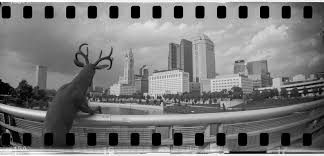
Lomography Sprocket Rocket Panoramic Film CameraThe sprockets really fascinate me and seem very ‘touristy’, especially when taking shots of the city or any landscape shot, it frames the city which seems to be in a blue filter with the red upon the sprockets really can draw the viewer into the shot. For this shot, the sprocket helps with the melancholy with the dark atmosphere of the shot, because the sprockets make it seem as though you are watching through an old tape full of grief. The gentle black and white film creates a sense of confusion and feeling lost.A very different kind of shot and very surreal but when paired with the sprockets it makes it again seem like from the 18th century and seems like a comic strip because of the deer peering off into the misty grey polluted city.
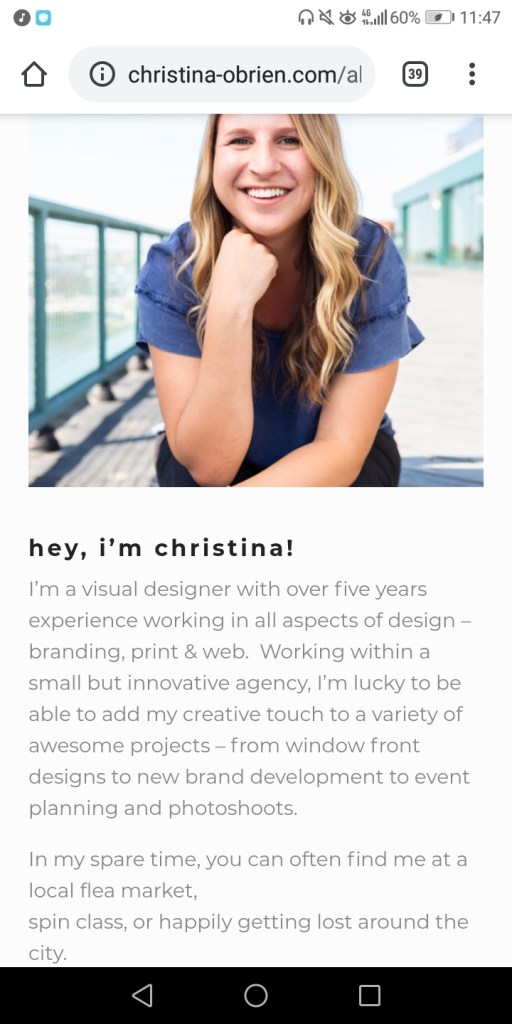
Pleasing and easy on the eye, basic, and minimalist (in a good way). She has set her photographs in rows and has made it clear that she does promotional photography, some of them being close-ups. So she has about 3 keywords along the top of her website (which is pastel coloured pink when hovering over, adding in small aesthetic details), she has “about” which includes a picture of her and a small but detailed enough amount of information about her and her photography. She also has “contact” which includes a map and her her contact information. I feel like the way she has put together her website, is very simple and easy but still has the little details that reveals the person she is behind the camera.
Navigation:
Super easy to navigate around due to the simple and easy layout of her website and how there are only 3 pages to access, yet includes everything we should want to know and click upon. It includes everything essential navigation wise which makes it really easy for everyone to use.
Communication:
I honestly feel as though her website strikes out the person who she is a lot, she loves everything to be organised, a minimalist, who is quite bubbly (due to the small pastel coloured, light details) and doesn’t like including too much that isn’t necessary, I feel as though it actually fits in too with the style of photography she does (promo), which is closeup and also minimalistic of what brand she is showing but also adds in the small details (like lights or the blur of other people) to make it more appealing to the eye.
What would I potentially take from her website to improve my own?:
Looking at her website really made me realise, how I don’t need to be including too much stuff, or at least the unnecessary parts and to include just mostly the essentials with small little details that are satisfying to navigate through or look at.
Leads to her portfolio when first clicking upon her website At the top is her pages available All about her
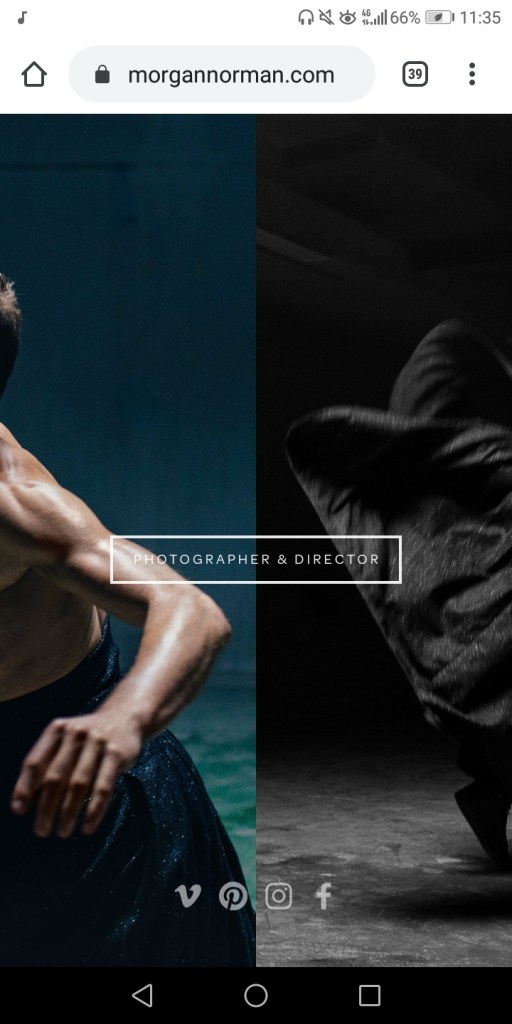
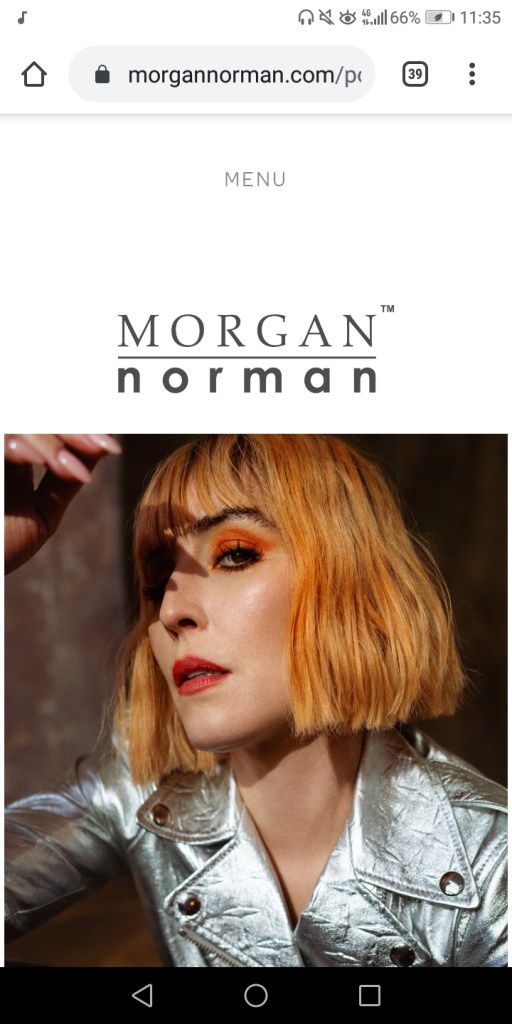
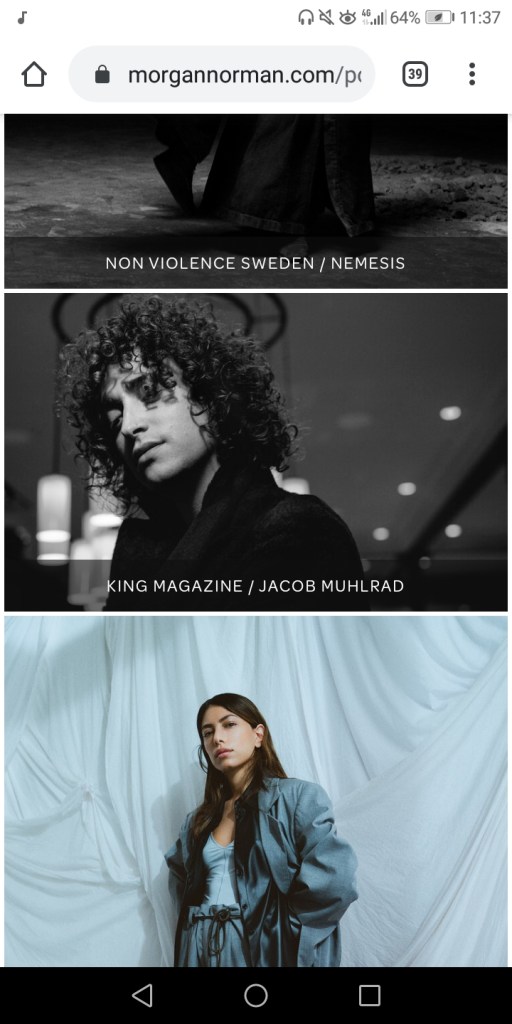
Firstly shows up with a main section that u click on first to access to his main website, which is much like the Brandon Woelfel website that I looked at. The first bit that shows up contains his social media contacts and then a small section that says “photographer and director” which leads onto his main website, I feel as though having this bit before the main website is actually useful because I feel as though social media should be on a separate part compared to the main portfolio which should be on the main website. Leading onto his portfolio where his photos are together and evenly spread out to the whole page but still leaving enough gaps and space for it to not become too much or too chaotic. The background is a plain black and white colour which helps his photographs stand out. His website layout is also quite simple with about 4 pages, which includes his film, about him (which includes a lot of information and a picture of him), his portfolio and his contact page.
Navigation:
The navigation for his website is very easy, it doesn’t lead you off on to other websites comes up with chaotic adverts or too many moving images or too much information which is incredibly helpful to anyone viewing or navigating through his website.
Communication:
It’s clear that the style of photography he does is edgy and bold portraits, as well as doing them for magazine covers, he’s very creative when it comes to taking it in a way that expresses the models personality which shows that he’s a very open minded photographer.
What would I potentially take from his website to improve my own?:
Possibly keeping the black and white background like he has, just to make everything not so chaotic and making my pictures stand out would be a suitable idea for getting across my own work.
The page before his main websiteLeads onto his pictures The pages available His portfolio against a plain black and white background